Pages

Pages

Friday, April 13, 2012

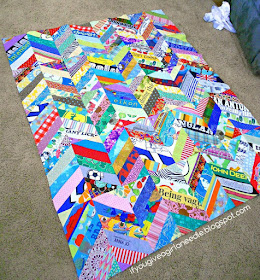
My First (Scrappy) Quilt: Part 3: Finished!

Disclosure: This post may contain affiliate links. If you purchase those items through my links I earn a commission. You will not pay more when buying a product through my link. Plus, when you order through my link, it helps me stumble along in this bloggy blog world! I appreciate your support! My husband who has to put up with my craft supply obsession does too :D All opinions expressed are my own, and I am not sponsored by any product manufacturer unless otherwise stated :)

____________________________________________________

SO I FINISHED. *happy dance* I think this was one of the most fulfilling projects I've done to date. But, to backpedal a leetle...

I wanted to try and keep this quilt as low budget as possible. The t-shirts and scraps were free, so I didn't really want to turn around a by a bunch of fabric for the back and batting. So, after a little research, I read somewhere that some people use flannel sheets as batting. And who has flannel sheets for cheap and in quite abundance?? DIRT CHEAP THAT IS WHO. I picked up a flannel flat sheet and then a yellow regular sheet, for a combined total of $5. Oh yeah. Then I laid everything out in the living room floor, and pinned like mad. Whoever named safety pins was delsuional. Those little buggers are some of the most dangerous things on the planet. But regardless.

I pinned like crazy and then I 'stitched the ditch' on the horizontal seams, because that seemed pretty straightforward. SEAMED. HAH. No. Ahh. Sorry you guys...its early! Then I quilted down the seams of every third diagonal piece. So I got this cool chevron pattern going on in the back. I made the binding out of leftover scraps, squealed and cried a little while I tried to miter the corners, but, ultimately it is finished! AND. I was about 3 feet away from finishing the binding when my machine just DIED. Like, just stopped. I think it was trying to tell me something, but, anyway, I went and pulled my other machine out, which I purposefully keep in storage for a reason (Its name should be, Sir Drops Every Other Stitch Alot) and soldiered through the last of the binding. ENOUGH TALK MORE PICHAHS.


SO. Overall I am excited about how it came out. In my normal perfection-ist state, there are some things that I wish were different, BUT. I will so be making more quilts. 

Thank you guys so much ^.^


Wednesday, April 11, 2012

My First (Scrappy) Quilt: Part 2: Top is DONE!

Disclosure: This post may contain affiliate links. If you purchase those items through my links I earn a commission. You will not pay more when buying a product through my link. Plus, when you order through my link, it helps me stumble along in this bloggy blog world! I appreciate your support! My husband who has to put up with my craft supply obsession does too :D All opinions expressed are my own, and I am not sponsored by any product manufacturer unless otherwise stated :)

____________________________________________________

I finished my quilt top today! I love the overwhelming non-matchiness of it...I'm not a matchy-matchy sort of girl, and I like things that are intriguing to look at. I would definitely recommend ironing the seams as you go along...I didn't do that until halfway through... o.O


I think I will attempt my own bias tape for this project too! I just need one of those...bias tape...metal...thingies :)

My First (Scrappy) Quilt: Part 1: Cutting

Disclosure: This post may contain affiliate links. If you purchase those items through my links I earn a commission. You will not pay more when buying a product through my link. Plus, when you order through my link, it helps me stumble along in this bloggy blog world! I appreciate your support! My husband who has to put up with my craft supply obsession does too :D All opinions expressed are my own, and I am not sponsored by any product manufacturer unless otherwise stated :)

____________________________________________________

I am an infected victim of instant craft gratification. In. A. Big. Way. SOO I finished cutting out all my pieces today! I am using this fabulous tutorial by Bijou Lovely Designs. I have wanted a t-shirt quilt for a while, but I decided to compromise with my need to get rid of my giant scrap pile and cut up my old t-shirts to use in this one! I supplemented them with fabric from my scrap pile and this is what I have so far;


One of many piles o' tshirt memories *sniff*


Wednesday, April 4, 2012

Ticket Stub Shadow Box

Disclosure: This post may contain affiliate links. If you purchase those items through my links I earn a commission. You will not pay more when buying a product through my link. Plus, when you order through my link, it helps me stumble along in this bloggy blog world! I appreciate your support! My husband who has to put up with my craft supply obsession does too :D All opinions expressed are my own, and I am not sponsored by any product manufacturer unless otherwise stated :)

____________________________________________________


Hello lovely people! So I stole this idea off of Pinterest; thus making this the first ever project that I have seen and actually followed through with! In my typical forgetful fashion, I didn't pin the original, but again I say, this isn't my original idea, just my version of it :)

I ran across an old shadow box I've had for ages, but never used because it was missing the back. 


I am a hoarder by nature, and anytime I go to a movie or event that half-way means something to me, I save the stub. I figured it would be a better testament to them if I fished them out of my bottom dresser drawer and displayed them!


A brief overview:

1. I cut several pieces of black cardstock to fit the back, leaving a roughly 1 1/2 inch opening at the top to slip the tickets in.
2. I cut the sleeves off of my brother's karate uniform (with permission!) and pleated them into some movie-theater style stage curtains. The top ruffle I attached to a dowel and glued it across the top, and the two side curtains I simply tacked down to the cardstock.
3. I found some ticket clipart online and attached them to the cardstock.
4. I brushed some gold paint on the box edges.
5. Put the new back on, and put my tickets in!

I forget how difficult it is photographing glass and not getting a reflection of my hand, face, leg, or otherwise in the picture!

It was super simple and didn't take long at all!

jordan