
I love planning birthday parties. I love the theme choosing and the decoration crafting and the food making and the invitation designing...all of it. I JUST LOVE IT.
So when my daughter's second birthday was approaching I lost my mind a wee bit and went all out on the Ice Cream Shop theme! I chose this for two reasons;
(1) I had scored a HUGE amount of ice cream party decor on Michael's clearance a few weeks earlier...cupcake liners, cupcake picks, napkins, adorable wooden spoons, paper lanterns, etc. I got a humongo bag full for less than $10 and figured I probably needed to put it to good use!
(2) I saw this cake by Sweet Little Morsels on Pinterest and decided I NEEDED TO MAKE IT.
As with all my projects and endeavors, I start out with the most difficult part of the thing and if I accomplish that first, its usually smooth sailing from there. I knew I wanted to practice the cake before the big day, so I eugoogled some tutorials (this one is super!) and muddled my way through. (And I'm sorry in advance, for I failed to take any pictures of this part...IM THE WORST, I KNOW...so just bear with me.)
For the ice cream cone topper, I packed some Rice Krispy Treat into my ice cream scoop, and turned it out onto some wax paper.
Then I melted some pink Candy Melts and completely covered the Rice Krispy 'ball'.
While that was drying, I cut a wooden skewer in half and poked it into the RK at the angle I wanted the cone to sit at. This is to give the cone a little more stability.
After that, I dipped a sugar cone into the Candy Melts, coating the edge nice and thickly, and stuck it onto the RK, over the skewer, and held it firmly together until the candy melt set up a little bit.
I then popped it into the refrigerator to firm up completely.
For the actual cake, I just used a box mix I had on hand, and used the AWESOME paper towel method for smoothing out buttercream frosting. It makes your icing SUPAH SMOOTH without having to use fondant. After that, I put the cake in the refrigerator as well to chill a bit before putting on the topper.
After everything was nice and chilly and the cone topper was plopped on the top, I made a white chocolate ganache that I colored the same pink as the Candy Melts I had used to form my 'melted ice cream scoop' I tried the get the pinks as similar as I could. I then covered the ice cream and the top of the cake with the ganache, and VERY CAREFULLY added the drips to the edges. To finish, I topped it off with sprinkles! SPRINKLLESS!!!!!!

I was pretty happy with how it turned out, but I knew I wanted the actual cake to be taller and skinnier, and the drips a little more 'drippy'. So I used a smaller diameter cake pan, made three layers, and thinned out my ganache.

In hindsight, I probably should have added some skewers to the cake to stop it from being kinda lean-y, but it stayed up alright for the most part so I was pleased.
I also made some cupcakes with the leftover batter and icing, and proceeded to decorate ALL THE THINGS in the house.

I snapped this with my potato cell phone camera the night before (it was like 3 am when I finished because I'm OCD about decorations)
Also, as a forewarning, all of these pictures are going to have super wonky exposure because I thought it would be a good idea to put the party table in front of our french doors that receive ALL THE DIRECT SUNLIGHT in the afternoon. So...just...I'm sorry about that. I DON'T ALWAYS PLAN WELL OKAY.


SPRINKLESSSSSSSSSSSSSSSSS!!!!

All in all, I was really pleased with how the cake turned out, and my daughter LOVED it! I got the chipboard glitter '2' either from Target or Michaels...I can't remember which...and the cake stand I found at the thrift store and spray painted a white/gold ombre.


The straws were from Target and the jewel-tone punch cups I found at Hobby Lobby on sale for $0.40 apiece!! YAS BUY ALL THE CUPS YASSS!

The spoons were part of my Michael's clearance haul, and the paper cups were found in the Target dollar bins. OH TARGET DOLLAR BINS HOW I LOVE THEE.

I also made some giant ice cream cones out of tissue paper and spray painted party hats! Super easy!


The door hanger I made out of some leftover deco mesh I had and a piece of scrapbook paper for the cone.

And a few pictures of the birthday girl...I found her dress at Target on a clearance rack and LOVED it so much! It was actually a shirt for an older girl but I took up the straps and the bottom hem and made it a dress! The headband I found at Dollar Tree and I made a little clay ice cream cone to go on top. BECAUSE THEMES.


Daddy helping blow the candles out!


We love ice cream...

Y'all. I have the best mom in the whole world. She drove 10 hours to be at my child's birthday party <3


All in all, it was a wonderful, fantastic day! I'm so grateful to have such lovely people to share it with!

For the ice cream cone topper, I packed some Rice Krispy Treat into my ice cream scoop, and turned it out onto some wax paper.
Then I melted some pink Candy Melts and completely covered the Rice Krispy 'ball'.
While that was drying, I cut a wooden skewer in half and poked it into the RK at the angle I wanted the cone to sit at. This is to give the cone a little more stability.
After that, I dipped a sugar cone into the Candy Melts, coating the edge nice and thickly, and stuck it onto the RK, over the skewer, and held it firmly together until the candy melt set up a little bit.
I then popped it into the refrigerator to firm up completely.
For the actual cake, I just used a box mix I had on hand, and used the AWESOME paper towel method for smoothing out buttercream frosting. It makes your icing SUPAH SMOOTH without having to use fondant. After that, I put the cake in the refrigerator as well to chill a bit before putting on the topper.
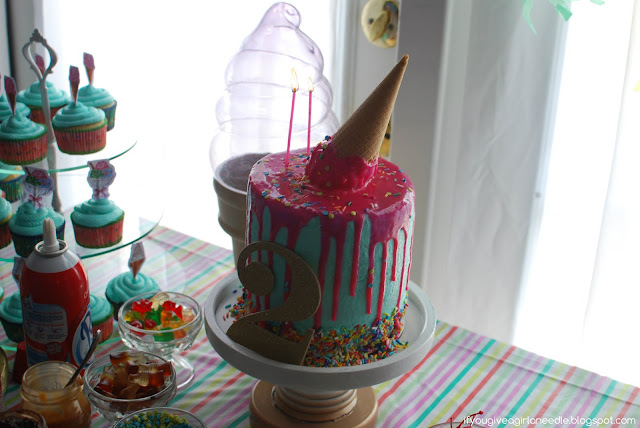
After everything was nice and chilly and the cone topper was plopped on the top, I made a white chocolate ganache that I colored the same pink as the Candy Melts I had used to form my 'melted ice cream scoop' I tried the get the pinks as similar as I could. I then covered the ice cream and the top of the cake with the ganache, and VERY CAREFULLY added the drips to the edges. To finish, I topped it off with sprinkles! SPRINKLLESS!!!!!!

I was pretty happy with how it turned out, but I knew I wanted the actual cake to be taller and skinnier, and the drips a little more 'drippy'. So I used a smaller diameter cake pan, made three layers, and thinned out my ganache.

In hindsight, I probably should have added some skewers to the cake to stop it from being kinda lean-y, but it stayed up alright for the most part so I was pleased.
I also made some cupcakes with the leftover batter and icing, and proceeded to decorate ALL THE THINGS in the house.

I snapped this with my potato cell phone camera the night before (it was like 3 am when I finished because I'm OCD about decorations)
Also, as a forewarning, all of these pictures are going to have super wonky exposure because I thought it would be a good idea to put the party table in front of our french doors that receive ALL THE DIRECT SUNLIGHT in the afternoon. So...just...I'm sorry about that. I DON'T ALWAYS PLAN WELL OKAY.


SPRINKLESSSSSSSSSSSSSSSSS!!!!

All in all, I was really pleased with how the cake turned out, and my daughter LOVED it! I got the chipboard glitter '2' either from Target or Michaels...I can't remember which...and the cake stand I found at the thrift store and spray painted a white/gold ombre.


The straws were from Target and the jewel-tone punch cups I found at Hobby Lobby on sale for $0.40 apiece!! YAS BUY ALL THE CUPS YASSS!

The spoons were part of my Michael's clearance haul, and the paper cups were found in the Target dollar bins. OH TARGET DOLLAR BINS HOW I LOVE THEE.


I also made some giant ice cream cones out of tissue paper and spray painted party hats! Super easy!


The door hanger I made out of some leftover deco mesh I had and a piece of scrapbook paper for the cone.

And a few pictures of the birthday girl...I found her dress at Target on a clearance rack and LOVED it so much! It was actually a shirt for an older girl but I took up the straps and the bottom hem and made it a dress! The headband I found at Dollar Tree and I made a little clay ice cream cone to go on top. BECAUSE THEMES.


Daddy helping blow the candles out!


We love ice cream...

Y'all. I have the best mom in the whole world. She drove 10 hours to be at my child's birthday party <3


All in all, it was a wonderful, fantastic day! I'm so grateful to have such lovely people to share it with!


