Showing posts with label sewing. Show all posts

Friday, September 19, 2014

Adult T-Shirt into Baby T-Shirt DIY

Disclosure: This post may contain affiliate links. If you purchase those items through my links I earn a commission. You will not pay more when buying a product through my link. Plus, when you order through my link, it helps me stumble along in this bloggy blog world! I appreciate your support! My husband who has to put up with my craft supply obsession does too :D All opinions expressed are my own, and I am not sponsored by any product manufacturer unless otherwise stated :)

____________________________________________________


As cute and wonderful as cloth diapers are, they can be rather bulky. They can kinda make your baby look like a lightening bug. A cute as a button lightening bug, but all that fluff on the tooshy can be kinda a pain to stuff into a onesie. SO  I decided it would be easier for L to wear t-shirts when we're around the house. The only problem? Baby tshirts can be few and far between AND expensive.

Ya'll know I don't do expensive. 

I looked around the interwebs for a tutorial and all the ones I found involved sewing on ribbing for the neckline and arm holes.

I don't like working with ribbing, ya'll...

It turns out all kinds of nasty bad.

SO first I tried cutting off the existing ribbing of t shirts I had and sewing that on. NO BUENO. After staring at it in frustration for about two hours, I had a duh moment and thought to myself, 'Self, why don't you just leave the ribbing on?' 

So I took myself to the thrift store and picked up a bunch of large sized shirts with appropriately stretchy neckholes.

Ingredients:
-Tshirts (or shirts) with large sized neckholes. You want a decent amount of existing ribbing to work with
-Sewing machine
-Serger (optional but awesome)
-Scissors
-Thread
-Double needle (also optional, but also awesome)
-A onesie that fits your cute little nugget bebe :)
-Marking pen (Or a sharpie haha)

STEP 1: Lay out your shirt ON DA GROUND. Or table, if you have it. My table is covered in laundry...thus...DA GROUND.


STEP TWO: CUT OFF YOUR ARMS. No really, cut off the sleeves and SAVE THEM. Also, cut down the sides of your shirt, so you have equal front and back pieces.


STEP THE THIRD: So This is kidna hard to explain, but really simple in actuality. Cut you shirt along the top of the shoulders, making sure that you leave more ribbing on the BACK of the neckline than the front. Basically cut it a little over halfway.


This is what it should look like now. Got it? PEACHY!


STEP 4: Overlap the back of your shirt piece over the front, like so. The white dashes are how the front piece should lay under the back piece. PIN THAT. 


STEP 5: Now take your nicely fitting onesie and line up the collar with your shirt-in-progress. PIN where the shoulder seam meets the sleeve. You are going to want to sew two lines of stitching at that seam line. 


It should look about like this. But preferably better, because I kinda jacked mine up. MOVING ON.


STEP 6: Again with your onesie, fold the sleeve under (or in) and trace the arm hole of your onesie onto your big t shirt. THEN SNIPPY SNIPPY. Cut a straight line all the way down your shirt, through both layers of fabric.


You should now have this. Again, except hopefully better and more even....MOOOVVING ON.


STEP SHEVEN: Remember those sleeves I told you NOT TO THROW AWAY? Yeah, better go grab them out of the trash if you didn't listen to me. Trace a sleeve shape out along the hem line of the existing sleeve. The sleeve pattern I have here I simply drew up on a piece of paper...you can trace an old onesie sleeve to make it easier on yourself.


STEP 8: I didn't take a picture of these last few steps, because they are basic t-shirt putting-togethery-stuff. And I'm not very good at explaining that part. THIS TUTORIAL is awesome for doing foolproof sleeves! Attach the sleeves as normal, and sew up the sides of your shirt. You can serge or hem the bottom if you want, as well as embellish to your hearts content! I am currently experimenting with sleeve styles and for this one I threaded elastic through the hem casing before attaching it to the shirt.

STEP 9: Put your pretty new shirt on the cutest baby you know! 

Please ignore the spit up...this is the appreciation I get for making L new clothes hahaha


BONUS: Take some of your leftover material and make your little girl a matching headband!


These are two others I made while I was experimenting with sleeves/embellishment :)


As always guys, thank you for stopping by! Feel free to ask me anything! I love questions! :)


Saturday, February 15, 2014

{My Thrifted Closet + Transformed Threads} :: $1 Valentine's Day Dress

Hey fabulous people! After some thought to where I wanted this blog to go, I've decided to started a series called 'My Thrifted Closet.' A lot of people probably think thrift store clothing = your grandma's clothes...which is understandable, 'cause, a lot of it IS your grandma's clothes (say noooo to high waisted gramma panties!). 

BUT. 


You CAN shop at the thrift store and look cute! 

wat. no u cant.


Yes! You absolutely can! And the plus side? You pay SO many less dollars! I dunno about you guys, but I have a hard time bringing myself to pay $45 for a shirt. Or $100 for a pair of pants. INSANITY I SAY. A good 85% of my wardrobe is from thrift stores, and yes, I wear it out in public ;) 

Which brings us to today's installment...my everso dire need for a Valentine's Day dress!

I picked up this largeish, rayon-y, and exceptionally shoulder-padded-y dress....thing...at my local GoodWill for $1. 


DREAMY. Very Mrs. Claus.


I picked it up because it had so much going for it (believe it or not);
1. It was red. Valentine's Day...red...BUENO!
2. There were no STAINS. Stains....NO BUENO!
3. I loved the lace at the hem...you can't tell but there are also these darling little pearls sewn all into it as well.
4. It was several sizes bigger than me.
{{When re-doing clothing, its always a good idea to start with a garment a few sizes bigger than you are because it gives you a bit (or a lot) more wiggle room and extra fabric to work with. Like in case you mess up. Not that I'd know. That neeevveerrrererer happens. O.O}}

I didn't end up taking many any in progress shots with this one (which I will do in the future!) because I was mildly crunched for time. Read: I started this 4 hours before we left for dinner.

Sooooo here are the afters! I was really jazzed at how it turned out!


A quick breakdown:
Chop off the sleeves
Chop off 3/4 of the skirt
Unpick the side seams and darts
Try on and take off dress like 4,506,203 times
Spend 30 minutes looking for your box of pins
Don't find pins
Take in the seams and darts
Adjust the height and width of arm holes


I randomly decided I liked the buttons down the back better...I love button backed things! I think it gives the back a nice little surprise. Or somethinseomthin.


Its terribly floofy and swingy! I kinda swayed my hips a bunch as the Fabulous Mr S and I were out and about :)

OH. And those weren't my cute sassy shoes. Cute sassy shoes rubbed cute sassy blisters and I traded them for my flippy floppies.


Yay! I loved wearing it! I will definitely wear it again...sometime in the future after the baby gets here, most likely. I am starting to enter the 'My clothes don't fit right around the ever expanding abdomen' phase, and it gave me a little bit of trouble with my normal sizing routine. BUT. I was super pleased and Mr S winked at me several times so that's perfect in my book :P


I hope you all had a lovely love-filled Valentine's Day!


Thursday, June 28, 2012

Jeans-to-Shorts Toooootorial! (Bleached/tie-dye shorts, that is!)

Disclosure: This post may contain affiliate links. If you purchase those items through my links I earn a commission. You will not pay more when buying a product through my link. Plus, when you order through my link, it helps me stumble along in this bloggy blog world! I appreciate your support! My husband who has to put up with my craft supply obsession does too :D All opinions expressed are my own, and I am not sponsored by any product manufacturer unless otherwise stated :)

____________________________________________________


I came across this tutorial a la Pinterest and thought it looked too easy not to try...so...I tried! And I am pretty happy with how it turned out! Yay! :D

1. So grab ye some jeans! Or some shorts...they can be any color, but the darker, the better! I bet khaki would look cool, but I haven't tried that yet. I had these jeans, and my stubby legs did weird things in them cause they were too long and and and its a long story. I don't like jeans. ANYWAY.


2. OFF WITH YER LEGS. I like to cut mine long so I have lots of room to mess up. Baha.


3. Grab a handful of rubber bands and tie up your shorts like you would a regular tie dye t shirt. 


4. Completely forget to take pictures of this ste- oh wait. Thatttt's just me. I'm sorry about that, girls and dudes, but I, once again, forget to photographically evidence this next step.

5. Acquire a plastic tub, and fill it with 1 part water and 1 part bleach. You'll want to put enough in there to completely cover your pants-wad.

6. Let it soak until its the color lightiness you want, and fish that sucker out! I left mine for about 30 minutes because I wanted SUPREME WHITENESS.


7. Now you can just leave them cut-offs, but I don't like cut-offs on me, so I hemmed mine. OPTIONAL. Totally optional :)


8. Go take awkward self-portraits of your pants in the driveway with your tripod!


Yeahhhh. LikeIsaid. AWKS. TOTZ AWKS.

Saturday, May 12, 2012

Sweater to Cardigan DIY

Disclosure: This post may contain affiliate links. If you purchase those items through my links I earn a commission. You will not pay more when buying a product through my link. Plus, when you order through my link, it helps me stumble along in this bloggy blog world! I appreciate your support! My husband who has to put up with my craft supply obsession does too :D All opinions expressed are my own, and I am not sponsored by any product manufacturer unless otherwise stated :)

____________________________________________________

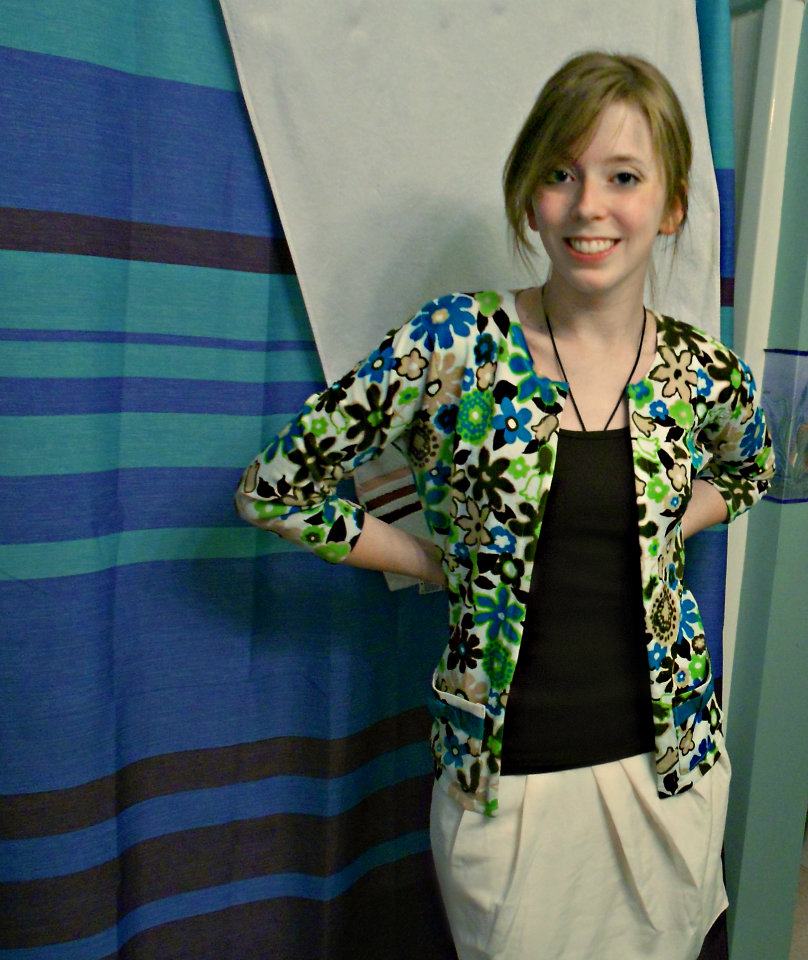
I have seen the sweater-to-cardi tutorial (in various forms) floating about on the interwebz, so I thought that I'd give it a try! (WARNING. ALL OF THESE PICTURES OF ME LOOK LIKE DEATH. Forget the 'warmed over'...just death o.O)

I picked up this too-big sweater from the thrift store today because I liked the print, I thought it was quite delightful!


1. I laid out mah sweater. On the ground, like the hipster craftswomen I think I am. 


2. Cut a straight line down the middle. Or up the middle. Whichever you prefers ;)


3. Bias tape. Get some of that stuff. 


4. Cut 2 pieces the same length as the front of your sweater, WITH EXTRA LEFT OVER. Maybe 2-3 extry inches or so. 


5. Lay your bias tape, right sides together with the front of your sweater, along your cut line. Sew along your bias tape edge. 


6. Then, flip over your tape to the WRONG side of the fabric, pin, and sew along the edge of your tape. Again :)


7. (optional) I hemmed the sleeves shorter, because I have persnickety wrists. I don't know...its just a thing with me...I know...its weird...ehhh.
8. (also optional, but totally more fun if you do it!) EMBELLISH THAT PUPPY. You can add buttons, pockets, lace for the collar, anything, really! Add some of your own personal pizzazz!
9. OHHH. AND. I took in the side seams a bit, because I like mine more fitted.


Here is mine. I think I will go back and add buttons later, but the main embellishing I did was make pockets out of the leftover material I cut from shortening the sleeves. NEVER THROW AWAY ANYTHING. YOU MIGHT NEED IT SOMEDAY.  Ahem. :D


This is really a great beginner project, I think! Just grab an old sweater and some bias tape, and you are basically home free! Its mainly hemming, and who doesn't LOVE to hem, right? Right...? RIGHHHTT?? Sorry. o.O

If you make one, I'd Love to see it!! Go! YOU! Go get a sweater, RIGHT NOW. You can do this!! DO IT!!!

Thanks so much you guys!!


Tuesday, May 1, 2012

I am IRON WOMAN!

Disclosure: This post may contain affiliate links. If you purchase those items through my links I earn a commission. You will not pay more when buying a product through my link. Plus, when you order through my link, it helps me stumble along in this bloggy blog world! I appreciate your support! My husband who has to put up with my craft supply obsession does too :D All opinions expressed are my own, and I am not sponsored by any product manufacturer unless otherwise stated :)

____________________________________________________

Alright you guys. I'm coming clean.

I, Jordan, am a delightfully addicted comic book nerd.

We're not talking, 'Oh I like to watch Spiderman sometimes' nerd. Its more of a sitting-in-the-movie-theater-and-yelling-at-the-screen-when-they-leave-out-important-facets-of-random-superheroes-that-no-one-else-has-any-idea-about.

I love Marvel comics, and after X-Men, the Avengers are definitely my favorite. Sooo I decided to show my Tony Stark love at the premiere this Friday with my very own Iron Woman Tee! (Even though Ant-man and the Wasp didn't warrant an appearance in the movie, EVEN THOUGH THEY WERE AVENGERS TOO)

BEHOLD.


I know what you are thinking. And YESITDOESLIGHTUP!!! What good is a non-lit Arc Reactor, I say!?

SORRY FOR THE POTATO QUALITY


POTATOOOO

I picked up a red and a yellow t shirt from Hobby Lobby today, and a four pack of those 'tap lights' that are battery powered and you can hang them up in closets and so forth. I sketched out several armor designs, as there are several different suit designs, and then just top stitched the details. TOP STITCHING JERSEY IS NOT NICE. NOT NICE AT ALL. 

These were a few of my sketchies in progressies. He has had SO MANY SUIT DESIGNS it was hard to pick just one! I finally settled on the last one, as it was just detailed enough to serve my purposes :)


And here is me with my brother!


I am actually pretty stoked about how it came out! I didn't think to use interfacing behind my stitching until halfway through, and the seams are kinda whack, but I am still excited about wearing it!!!

Thanks you guys!


Related Posts Plugin for WordPress, Blogger...